
MONTHLY MID-CENTURY MAKEOVER
When talking about mid-century and retro home renovations most people immediately think of the kitchen. This really isn't surprising, since the kitchen was the place to be in the 50s! It's where you could find mom's fresh baked cookies, it's where the family gathered for meals and daily discussions, in fact, the kitchen was almost like another member of the family. While flipping through my vintage 50's Home and Garden magazines, I often come across articles with titles such as "Our kitchen's first Christmas." Or "A day in the life of our kitchen." It was truly the hub of the family home, so what better room than the kitchen to kick off my monthly renovation series?
I broke this article down into six categories; color schemes, flooring, cabinets, hardware and faucets, and appliances, and furniture and accessories. I hope this will give you a good starting point for your retro kitchen renovations!
Let's Begin!
 /
/
Wouldn't it be grand if we could simply move into a new home like this family, and have a beautiful mid-century kitchen just waiting for us? Unfortunately for most of us, this will never happen, but do not fret! With a little elbow grease and a lot of patience you too can have the retro kitchen of your dreams! So let's begin at the beginning, what does a retro mid-century look like? Most people will picture a dainty room, decorated in red, white, and chrome, and featuring a cherry design on all the accessories. While this kitchen certainly did exist, it's only one of many, many great kitchen designs from the 50s. Here are a few examples of some fabulous kitchens to get your creative motors running.


As you can see, there were an array of kitchen designs available in the 50s. From quaint country style, to large, sleek, and modern, each style was packed with it's own grace and charm. The first step of your kitchen renovation should be to choose the style of kitchen that will best suit your home, your needs, and your budget.


As you can see, there were an array of kitchen designs available in the 50s. From quaint country style, to large, sleek, and modern, each style was packed with it's own grace and charm. The first step of your kitchen renovation should be to choose the style of kitchen that will best suit your home, your needs, and your budget.
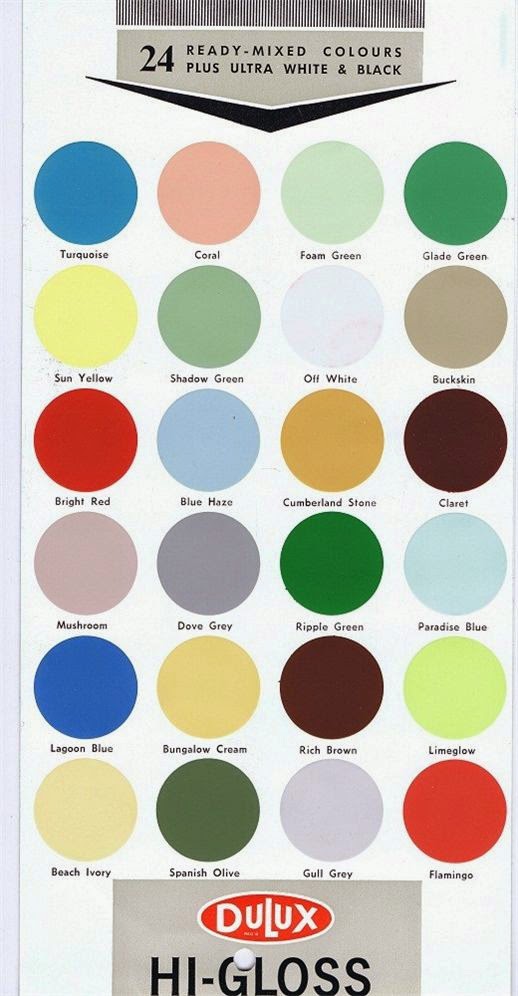
Color Schemes
When it comes to color there are more than enough options, from the brightest of blues to the palest of pinks, and everything in between.


When it came to cabinets in the 50s there were three main things women were looking for; beauty, durability, and storage capabilities. Not unlike the Ikea units of today, many kitchens featured removable and replaceable draws in a variety of sizes to suit each woman's needs. However, UNLIKE the Ikea units of today, the cabinets of the 50's were made of steel or solid wood.
When choosing your perfect color scheme keep furniture and accessories in mind. Will you be using current furniture, or will you be hunting for that perfect vintage piece? If you choose to go the latter route be forewarned, certain pieces in certain colors can be extremely hard to find. For example, if you plan on buying a vintage chrome dinette finding one in red (especially with matching chairs) is rare. However, if you want a yellow dinette set you'll have much better luck.
Counter tops are another thing to keep in mind when thinking about color. Vintage Formica reproductions are available, and they range in price depending on style and color.
Flooring
I think the flooring is my favorite part of retro kitchen makeovers. Back in the 50s vinyl and plastic tiling was all the rage, and not just for kitchen, they covered the entire house in them! I grew up in a house that featured a kitchen floor of pale yellow tiles, speckled with every color of the rainbow. Unfortunately it was the 80s and my parents found these tiles to be absolutely hideous and eventually replaced them.
Finding authentic vintage flooring today can be difficult, but that's OK, because it wasn't the design on the tiles that made them amazing, it was the floor designs themselves that were spectacular! A quick search of your local hardware or home improvement store should yield you results fairly close to the vintage look you're seeking. Of course, it never hurts to do a quick search on eBay or other such sites as random boxes of vintage tile does pop up now and again.
When deciding how to lay your tile, don't be afraid to get creative, there are no rules here! Of course if you aren't feeling overly artistic the classic checkerboard look always works.
Cabinets
If you're lucky enough to have moved into a mid-century home that still has it's originally cabinets refurbishing them shouldn't be too difficult, depending on the look your going for. If you're starting from scratch, there are a few companies around who salvage vintage cabinets from houses that will be torn down. Sometimes you can get some fantastic deals from these companies, it's simply a matter of tracking them down (a lot of them don't have websites).
If you have a large budget you may want to consider having custom cabinets made. This option allows you to get the exact look you're looking for, and may be the only way to go for certain looks, such as round or curving cabinets.
Hardware and Faucets
Finding authentic hardware isn't always difficult, but it can be pricey. When doing a search for my own home I was able to find the vintage chevron pulls I wanted, priced at $20.00 piece. Spending close to $2000.00 for just hardware was not something I was interested in doing, but if this isn't a problem for you, you should be able to find what you're looking for.
The faucets weren't anything too spectacular, in fact faucet design hasn't changed much in the last 60 years. Here's an example of your basic mid-century faucet.
However, if a mid-century lady wanted to get fancy, there were a couple options (and apparently they were the only way to get husbands to help with the dishes.)
There are some pretty fantastic reproductions available, such as this new Dishmaster Imperial Four, which retails for about $265.00 USD.
Appliances
Whether you buy restored vintage pieces, or brand new reproductions, the appliances will be the most expensive part of the renovation. Vintage appliances came in both gas and electric, and in an array of colors and sizes.
Look at this behemoth! They sure don't make them like this anymore.
Some things from the 50s never quite took off, like this fabulous wall fridge.
If you're choosing to go with a reproduction, there are many options available to you. I will add a list of links at the bottom of this article for where to obtain some beautiful reproductions.
Furniture and Accessories
For me, the hunt for vintage furniture is the most exciting (and sometimes frustrating) part of any renovation. It's a never ending process of treasure hunting through yard sales, antique stores, Craigslist ads, and estate sales. As I mentioned earlier, some pieces can be more difficult to find than others, but if you're open minded about color and style you could end up with a real gem!
Just like everything else, there was a variety of furniture styles used in the 50s, but the most popular by far are the chrome dinette sets.
It wasn't uncommon to mix and match the table and chair colors, so if you can't find a complete set it's not all that bad, those green chairs look just lovely with that yellow table.
When it comes to accessories the options are endless. I'm not going to attempt to list all the possible kitchen accessories you could add to your collection, but Pyrex and Kromex are a good start.
This is a small sample from my own personal collection.
Well, this sums up this months Mid-Century Makeover. I hope you found it informative and got some good ideas for your own kitchen renovation. Next months makeover will be all about living rooms! Below is a list of websites to help you with your renovation needs. I appreciate all comments and recommendations!
